> ## Documentation Index
> Fetch the complete documentation index at: https://docs.autocoder.cc/docs/llms.txt
> Use this file to discover all available pages before exploring further.
# Build Apps from Natural Language with AutoCoder.cc
> Build is AutoCoder.cc's core module — turn natural-language descriptions into working app prototypes. Walk through requirement capture, structure generation, and live demo pages without writing code.
**Build** is the core capability module of AutoCoder.cc, helping you quickly generate application prototypes using natural language. Simply describe the product requirements you want to build, and AutoCoder.cc will automatically understand your ideas to generate the corresponding application structure and demo page.
In AutoCoder.cc, a complete build process typically includes the following stages:
Through this approach, you can start with a simple idea, gradually build and optimize your application, without needing to write code manually.
***
## Requirement input
Requirement input is the first step in building an application with AutoCoder.cc. Simply describe the product you want to create using natural language, and the system will automatically understand your needs to generate the corresponding project structure.
### Prompt optimization
When inputting requirements, AutoCoder.cc helps you optimize your prompt, making your requirements clearer and improving the accuracy of the generated results.
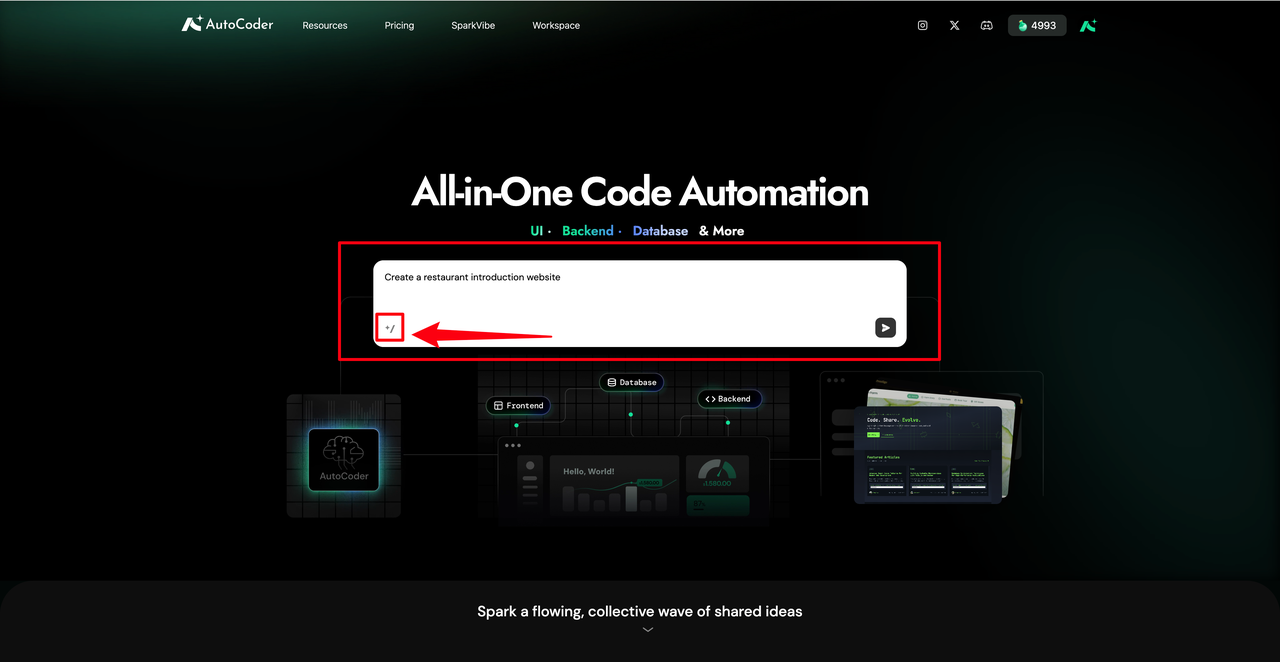 For example, when you input a simple product idea, the system automatically helps you supplement a more complete description:
**Original user input:**
> Create a restaurant introduction website
**System-optimized prompt:**
> Design a restaurant introduction website with the following detailed requirements:
>
> 1. **Functional requirements:** The website should provide an overview of the restaurant, including its history, cuisine features, chef introduction, and contact information. It should also display the menu with images and prices, offer reservation instructions, and include customer testimonials to enhance credibility.
> 2. **Page design:** The main pages include a homepage highlighting the restaurant's unique selling points, an about us page, a menu page with categorized dishes, a chef introduction page, a reservation guide page, a customer testimonials section, and a contact page with location and business hours.
**Benefits of Prompt Optimization:**
* **Express** product requirements more clearly.
* **Improve** the accuracy of generated content.
* **Reduce** the number of subsequent modifications.
### Query suggestion auto-fill
To help you start your project quickly, AutoCoder.cc provides recommended query examples. The system automatically recommends common application scenarios, such as:
* Restaurant Website
* Personal Portfolio
* SaaS Dashboard
* E-commerce Landing Page
Press **`Enter`** to select the recommended content, or modify it based on the suggestion.
### Homepage showcase
On the homepage, you can explore sample project showcases. These examples help you understand the types of applications AutoCoder.cc can generate and provide inspiration for your project.
For example, when you input a simple product idea, the system automatically helps you supplement a more complete description:
**Original user input:**
> Create a restaurant introduction website
**System-optimized prompt:**
> Design a restaurant introduction website with the following detailed requirements:
>
> 1. **Functional requirements:** The website should provide an overview of the restaurant, including its history, cuisine features, chef introduction, and contact information. It should also display the menu with images and prices, offer reservation instructions, and include customer testimonials to enhance credibility.
> 2. **Page design:** The main pages include a homepage highlighting the restaurant's unique selling points, an about us page, a menu page with categorized dishes, a chef introduction page, a reservation guide page, a customer testimonials section, and a contact page with location and business hours.
**Benefits of Prompt Optimization:**
* **Express** product requirements more clearly.
* **Improve** the accuracy of generated content.
* **Reduce** the number of subsequent modifications.
### Query suggestion auto-fill
To help you start your project quickly, AutoCoder.cc provides recommended query examples. The system automatically recommends common application scenarios, such as:
* Restaurant Website
* Personal Portfolio
* SaaS Dashboard
* E-commerce Landing Page
Press **`Enter`** to select the recommended content, or modify it based on the suggestion.
### Homepage showcase
On the homepage, you can explore sample project showcases. These examples help you understand the types of applications AutoCoder.cc can generate and provide inspiration for your project.
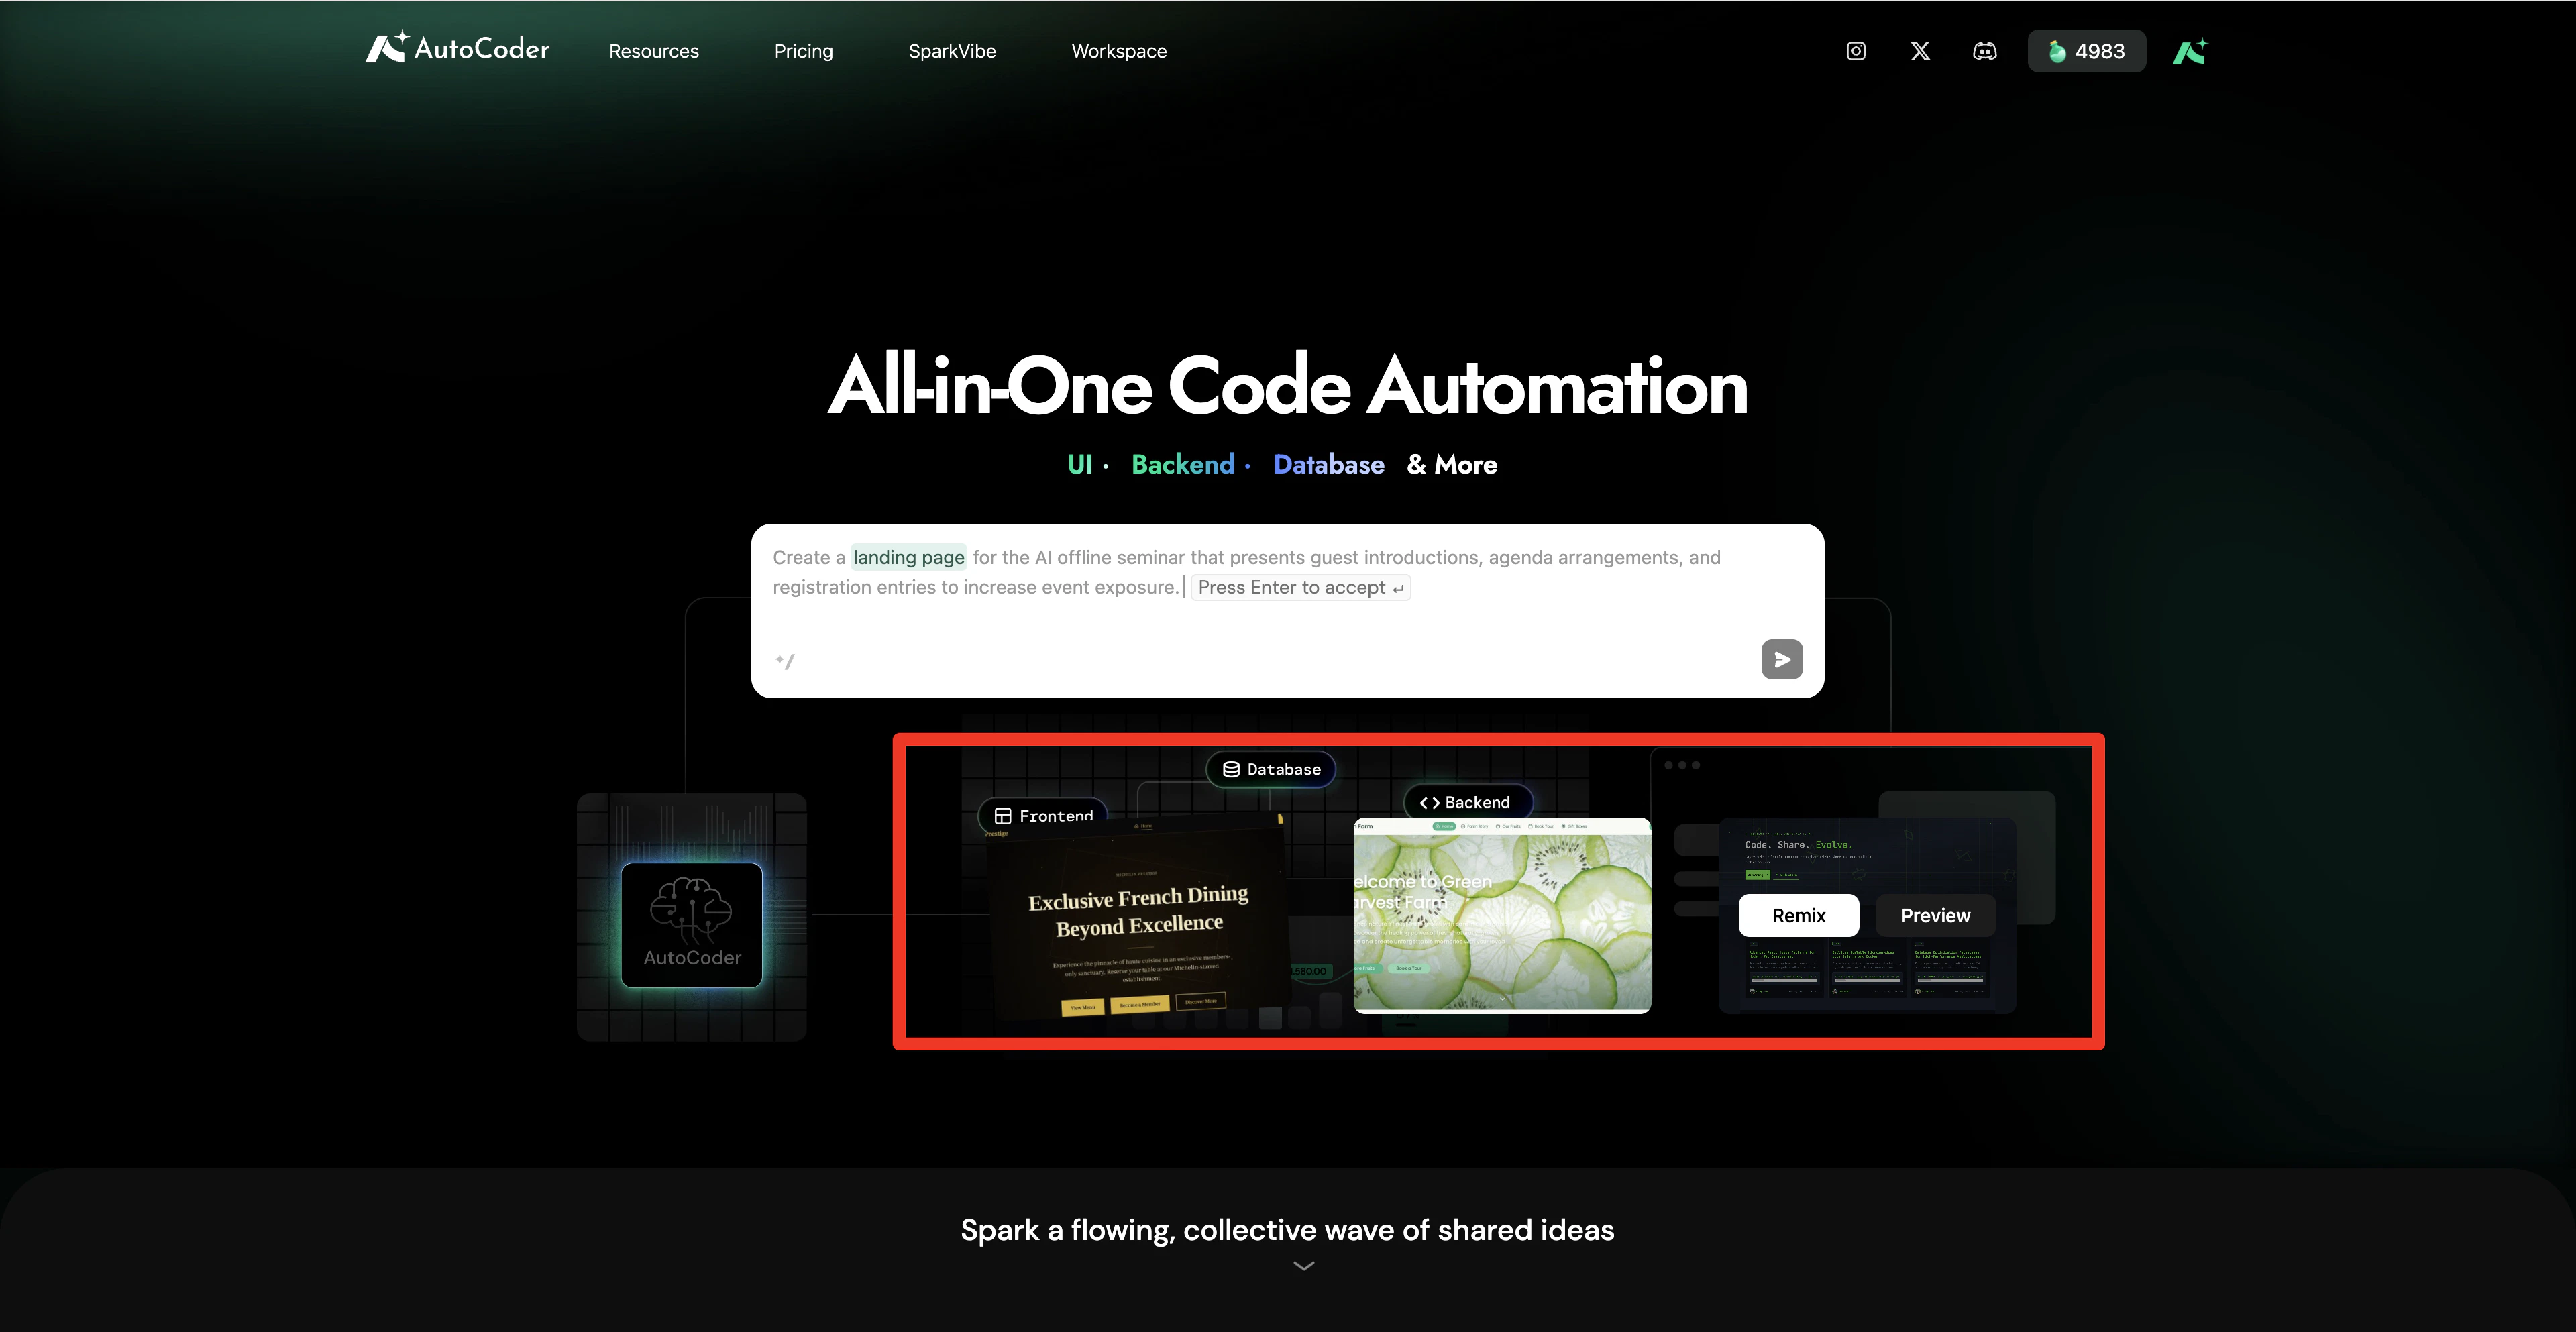 Click **Preview** to experience the sample project's demo page and view its structure and effects.
Select **Remix** to create a new application based on a sample project. The system will generate a new project draft for you to modify.
***
## Requirement List
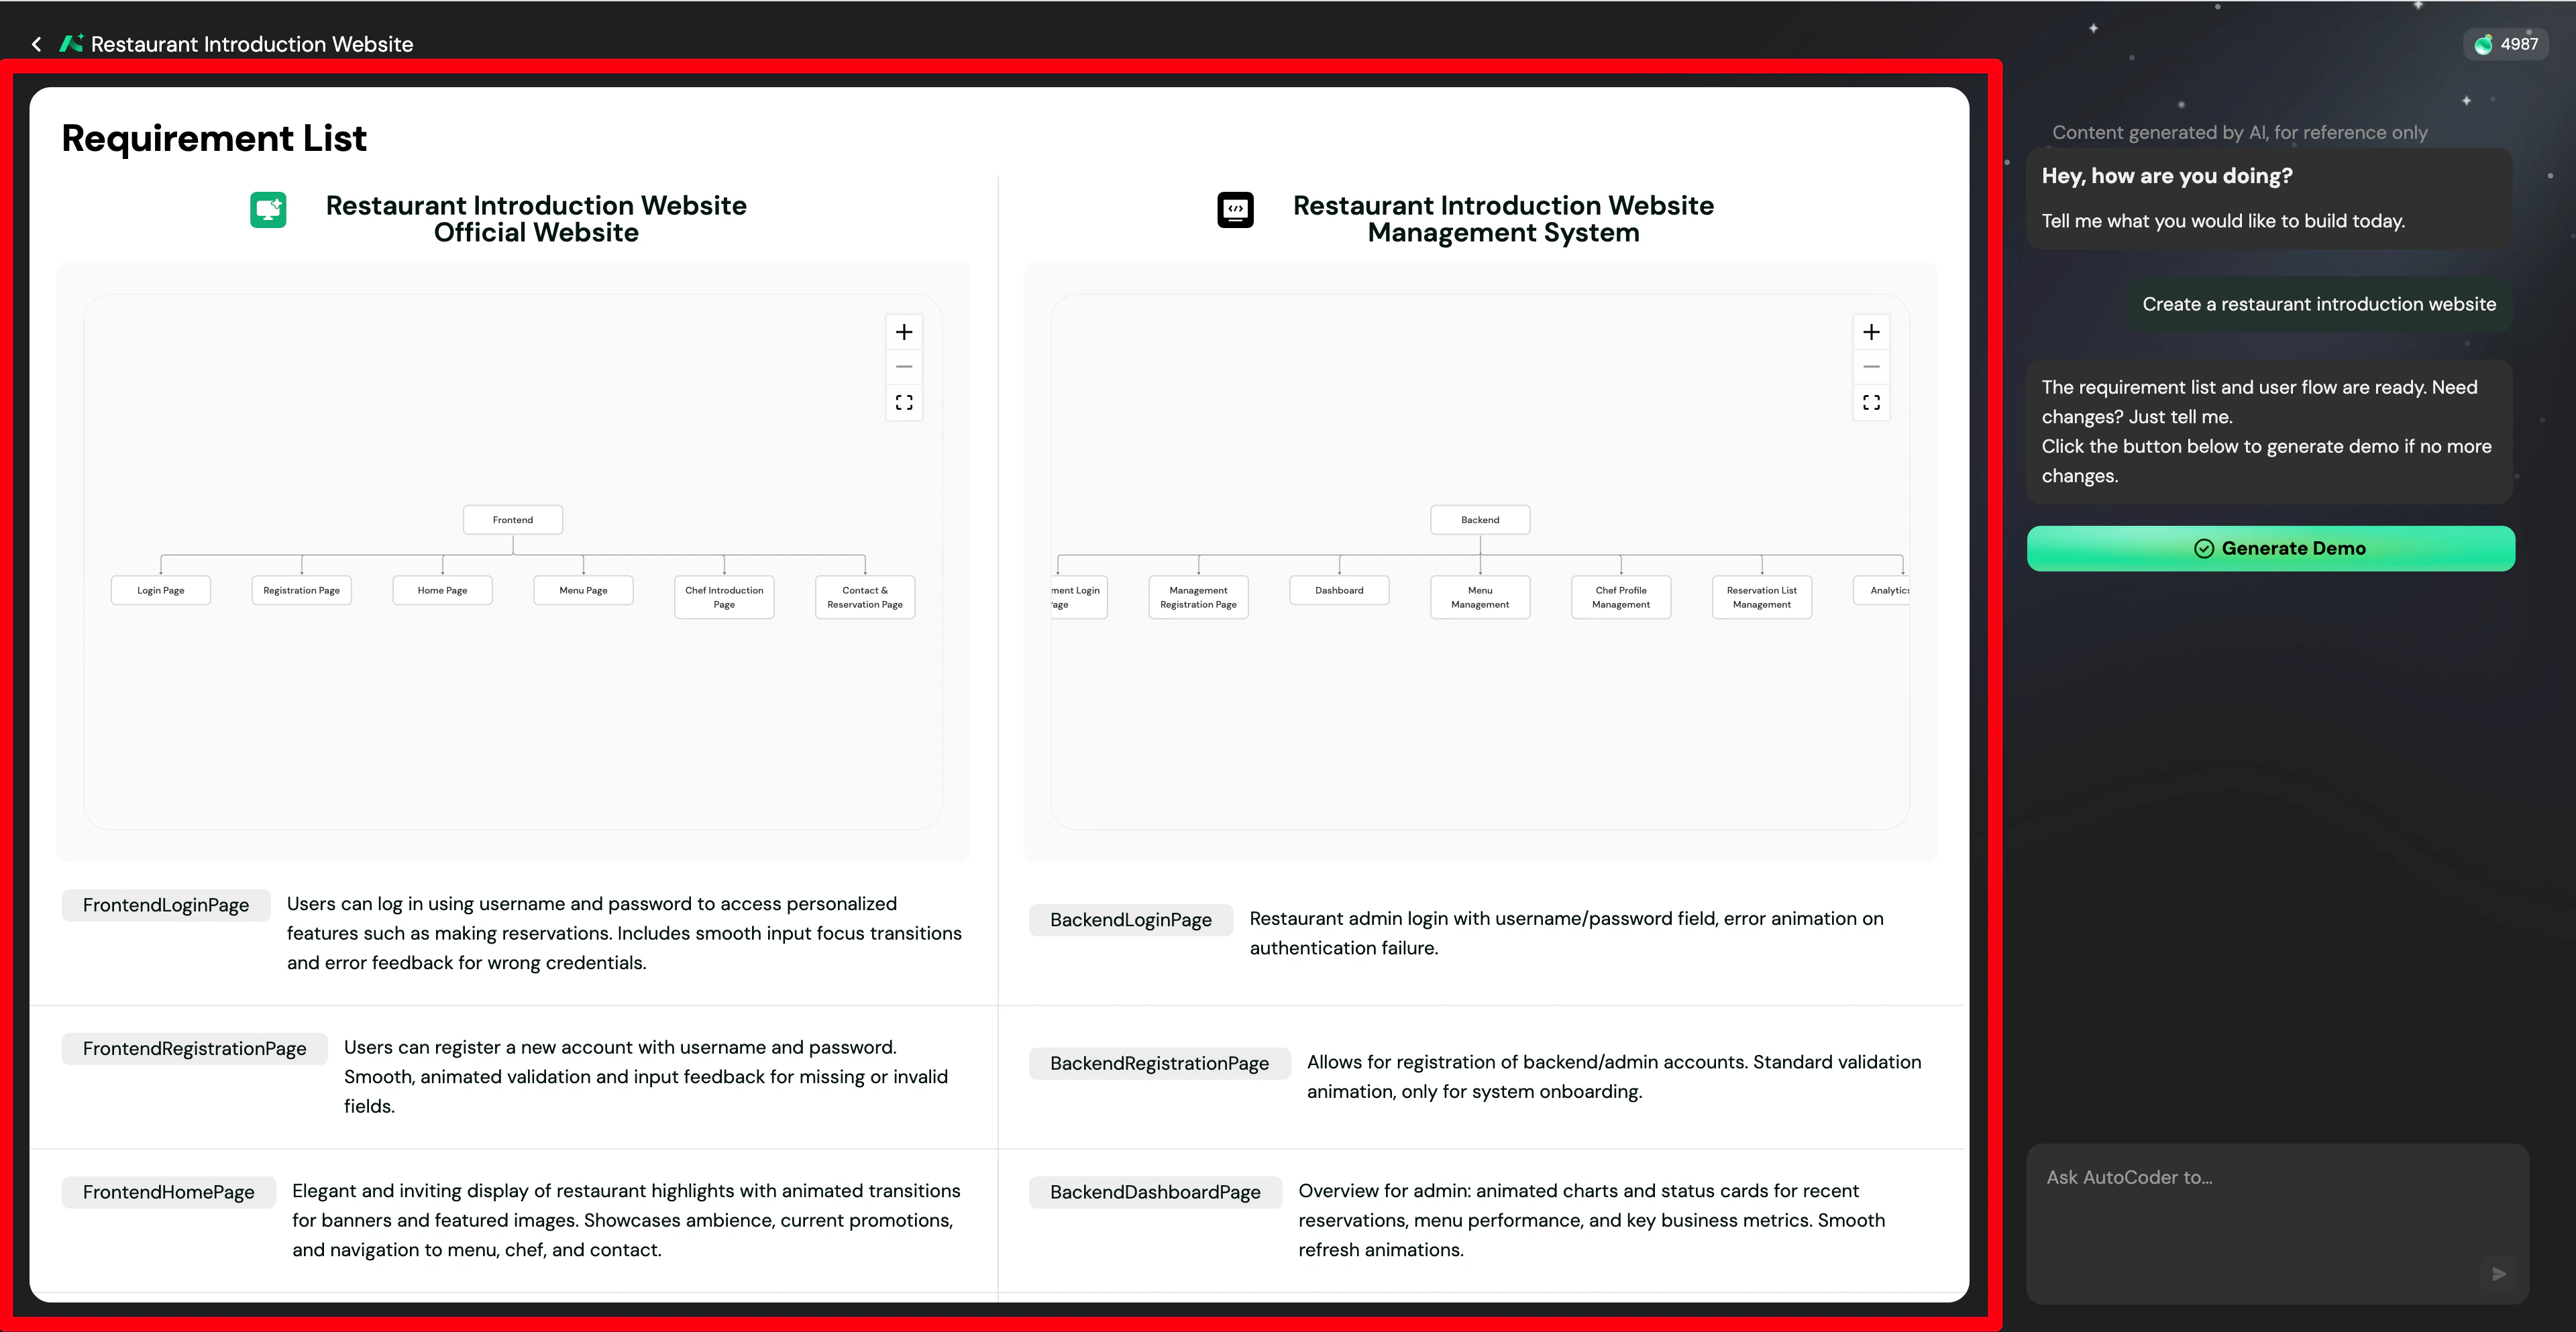
After submitting your requirements, AutoCoder.cc automatically converts your input into a structured **Requirement List**. This helps you confirm the application structure before generating the demo and allows you to continue optimizing product requirements.
The **Requirement List** interface mainly consists of two parts:
1. **Display area**: Shows the application structure parsed by AutoCoder.cc, including pages and functional modules.
Click **Preview** to experience the sample project's demo page and view its structure and effects.
Select **Remix** to create a new application based on a sample project. The system will generate a new project draft for you to modify.
***
## Requirement List
After submitting your requirements, AutoCoder.cc automatically converts your input into a structured **Requirement List**. This helps you confirm the application structure before generating the demo and allows you to continue optimizing product requirements.
The **Requirement List** interface mainly consists of two parts:
1. **Display area**: Shows the application structure parsed by AutoCoder.cc, including pages and functional modules.
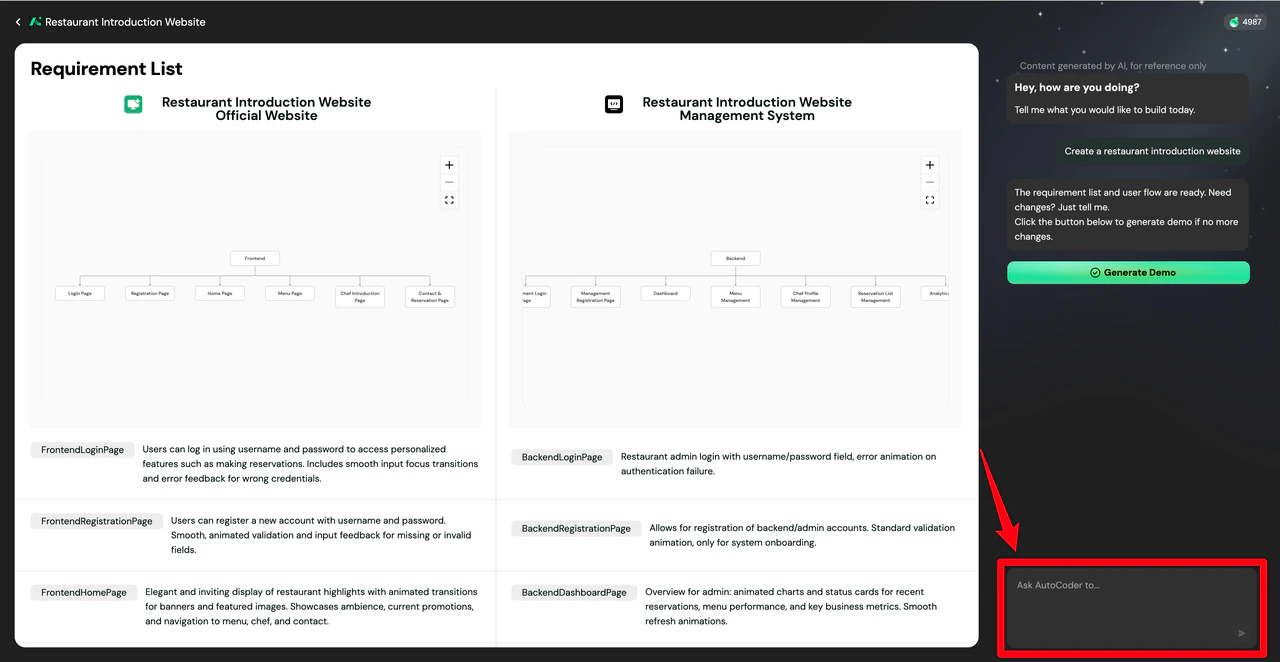
 2. **Chat area**: Continue to modify requirements through the chat (e.g., add new functional modules, adjust page structures, or modify product logic).
 ### Platform support
AutoCoder.cc supports generating different types of application projects to cater to diverse product development needs:
* 🌐 **Website**
* 📱 **Mobile App**
* ⚙️ **Backend**
***
## View & structure management
### View switching
On the demo page, switch between different views to intuitively inspect the application's structure and layout across various platforms, including **Web View**, **App View**, and **Backend View**.
### Controller
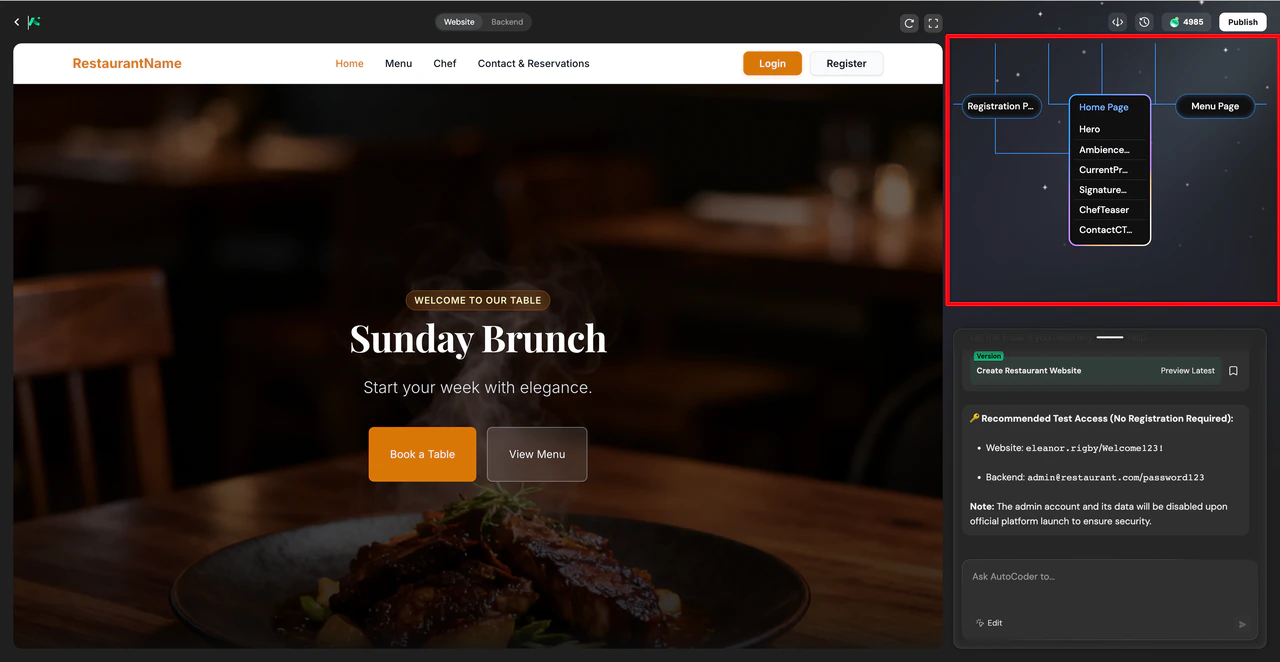
The controller displays the current project's page structure and synchronously updates when the structure changes (such as adding or deleting pages). Use the controller to quickly locate pages you need to view or edit, allowing you to flexibly manage the entire application structure.
### Platform support
AutoCoder.cc supports generating different types of application projects to cater to diverse product development needs:
* 🌐 **Website**
* 📱 **Mobile App**
* ⚙️ **Backend**
***
## View & structure management
### View switching
On the demo page, switch between different views to intuitively inspect the application's structure and layout across various platforms, including **Web View**, **App View**, and **Backend View**.
### Controller
The controller displays the current project's page structure and synchronously updates when the structure changes (such as adding or deleting pages). Use the controller to quickly locate pages you need to view or edit, allowing you to flexibly manage the entire application structure.
 ***
## Modification & iteration
After generating the demo, AutoCoder.cc provides two ways for you to continue refining the application content.
### Chat modification
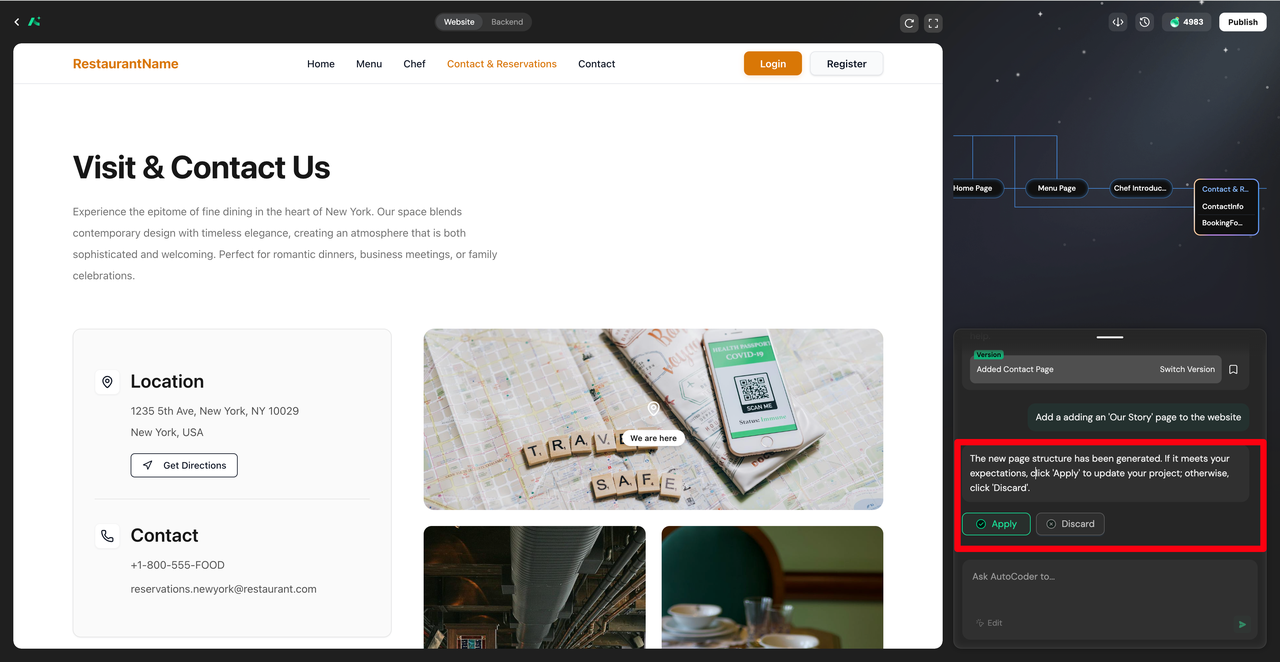
Simply describe the content you want to adjust using natural language. AutoCoder.cc will automatically update the page structure or component content, enabling rapid iteration without regenerating the entire project.
**Supported modifications:** Add new pages / Delete pages / Modify page layouts / Add new functional modules.
**Example command:**
> "Add an 'Our Story' page to the website."
***
## Modification & iteration
After generating the demo, AutoCoder.cc provides two ways for you to continue refining the application content.
### Chat modification
Simply describe the content you want to adjust using natural language. AutoCoder.cc will automatically update the page structure or component content, enabling rapid iteration without regenerating the entire project.
**Supported modifications:** Add new pages / Delete pages / Modify page layouts / Add new functional modules.
**Example command:**
> "Add an 'Our Story' page to the website."
 ### Visual Editing
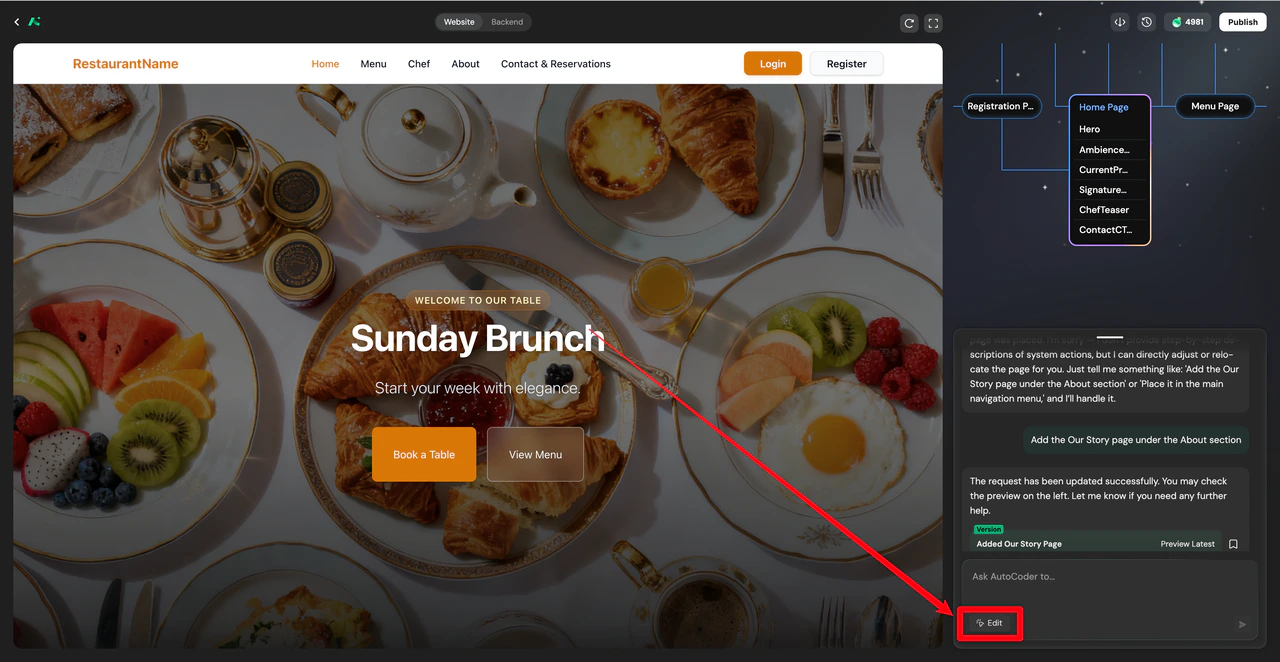
**Visual Editing** allows you to make visual modifications directly within the generated demo page. Click the **Edit** button to enter edit mode, then simply click on a page component to open the corresponding editing panel.
### Visual Editing
**Visual Editing** allows you to make visual modifications directly within the generated demo page. Click the **Edit** button to enter edit mode, then simply click on a page component to open the corresponding editing panel.
 Click any text element to directly modify text content, typography, and color via the floating panel.
Select an image to replace it. Supports drag-and-drop or local file upload (JPEG/PNG only, under 10MB).
Click an icon to open the built-in icon library. Search, replace, and adjust colors or border radii to match your brand style.
Adjust button colors and border radii using the color picker; click blocks (or div containers) to modify background properties, margins, and padding.
**Saving modifications note:** Clicking **Save** only saves the current modifications without generating a new version record. To save the current changes as a new version, you must exit edit mode after saving. The system will then automatically create a new version record.
***
## Version History
During the application building process, AutoCoder.cc automatically records the project's **Version History**. Version management helps you retain important versions during the modification process.
* **Revert to a previous version**: If a modification result is unsatisfactory, quickly revert to a previous state to avoid repetitive operations and confidently try different solutions.
* **Mark/favorite a version**: When the project reaches a crucial stage, manually mark or favorite the current version for easier tracking and management later.
Click any text element to directly modify text content, typography, and color via the floating panel.
Select an image to replace it. Supports drag-and-drop or local file upload (JPEG/PNG only, under 10MB).
Click an icon to open the built-in icon library. Search, replace, and adjust colors or border radii to match your brand style.
Adjust button colors and border radii using the color picker; click blocks (or div containers) to modify background properties, margins, and padding.
**Saving modifications note:** Clicking **Save** only saves the current modifications without generating a new version record. To save the current changes as a new version, you must exit edit mode after saving. The system will then automatically create a new version record.
***
## Version History
During the application building process, AutoCoder.cc automatically records the project's **Version History**. Version management helps you retain important versions during the modification process.
* **Revert to a previous version**: If a modification result is unsatisfactory, quickly revert to a previous state to avoid repetitive operations and confidently try different solutions.
* **Mark/favorite a version**: When the project reaches a crucial stage, manually mark or favorite the current version for easier tracking and management later.